Android自定义View:实例篇——字符滑动栏

前言

现在在大多数具有联系人功能APP上边,很多都具有字符索引栏的功能,以方便用户更快的定位到要找的联系人。尤其是在联系人数量比较多的时候,这个功能就显得尤为快速方便了。此篇博客,将教大家来实现这么一个字符滑动栏。话不多说,先看下效果图。

其中,最右侧的滑动栏我们称为“字符滑动栏”,命名为CharSlideBar; 中间显示字符的视图我们称为“字符指示视图”,命名为CharIndicateView

步骤

1、绘制出字符滑动栏CharSlideBar
2、添加字符滑动栏CharSlideBar的点击滑动监听事件
3、绘制出字符指示图CharIndicateView
4、字符滑动栏CharSlideBar与字符指示图CharIndicateView建立关联

具体实现

绘制出字符滑动栏CharSlideBar

自定义View属性
1
2
3
4
5
6
7
8
9
10
11
<!--字符索引栏的自定义属性-->
<declare-styleable name="CharSlideBar">
<!--字体大小-->
<attr name="barTextSize" format="dimension" />
<!--字体颜色-->
<attr name="barTextColor" format="color" />
<!--要显示的字符-->
<attr name="barChars" format="string" />
<!--背景色-->
<attr name="barBackground" format="color" />
</declare-styleable>
实现CharSlideBar类,继承自View

同时实现其构造方法,并初始化相关自定义属性。

1
2
3
4
5
6
7
8
9
10
11
12
13
14
15
16
17
18
19
20
21
22
23
24
25
26
27
28
29
30
31
32
33
34
35
36
37
38
39
40
41
42
43
44
45
46
47
48
49
50
51
52
53
54
55
56
57
58
59
60
61
62
63
64
65
66
67
public class CharSlideBar extends View {
/*可自定义相关属性*/
private String mChars = "ABCDEFGHIJKLMNOPQRSTUVWXYZ#"; //要显示的所有字符(此处为默认值)
private int mBackgroundColor = Color.GRAY; //背景色(此处为默认值)
private int mCharTextSize = 30; //字体大小(此处为默认值)
private int mCharTextColor = Color.BLACK; //字体颜色(此处为默认值)
private int mCanvasColor = Color.TRANSPARENT; //画布颜色
private int mLastSelectedPosition = -1; //记录上次选中的位置
private Paint mPaint; //画笔
private Paint.FontMetricsInt mFontMetricsInt; //字体度量值
private CharIndicateView mCharIndicateView; //字符指示视图
private OnSelectedListener mOnSelectedListener; //字符选中的监听
public CharSlideBar(Context context) {
this(context, null);
}
public CharSlideBar(Context context, AttributeSet attrs) {
super(context, attrs);
//初始化View相关自定义属性
initFromAttributes(context, attrs);
//初始化相关操作
init();
}
/**
* 初始化View相关自定义属性
*
* @param context
* @param attrs
*/
private void initFromAttributes(Context context, AttributeSet attrs) {
//获取相关View属性
TypedArray a = context.getTheme().obtainStyledAttributes(attrs, R.styleable.CharSlideBar, 0, 0);
try {
String chars = a.getString(R.styleable.CharSlideBar_barChars);
mChars = chars == null ? mChars : chars;
mCharTextSize = a.getDimensionPixelSize(R.styleable.CharSlideBar_barTextSize, mCharTextSize);
mCharTextColor = a.getColor(R.styleable.CharSlideBar_barTextColor, mCharTextColor);
mBackgroundColor = a.getColor(R.styleable.CharSlideBar_barBackground, mBackgroundColor);
} finally {
//回收TypedArray
a.recycle();
}
}
/**
* 初始化操作
*/
private void init() {
mPaint = new Paint(Paint.ANTI_ALIAS_FLAG);
//文字水平居中显示
mPaint.setTextAlign(Paint.Align.CENTER);
//设置字体大小
mPaint.setTextSize(mCharTextSize);
//设置字体颜色
mPaint.setColor(mCharTextColor);
//获取FontMetricsInt
mFontMetricsInt = mPaint.getFontMetricsInt();
}
...//省略
}

此处不再详细介绍,具体可参见上篇博客:Android自定义View:基础篇

重写onDraw(Canvas canvas)方法
1
2
3
4
5
6
7
8
9
10
11
12
13
14
15
16
17
18
19
@Override
protected void onDraw(Canvas canvas) {
super.onDraw(canvas);
//设置索引栏背景色
canvas.drawColor(mCanvasColor);
//单个字符所占的高度
float singleCharHeight = ((float) getHeight()) / mChars.length();
//字符要显示的x值
float charX = ((float) getWidth()) / 2;
//计算出字体高度
int fontHeight = mFontMetricsInt.descent - mFontMetricsInt.ascent;
//计算出竖直方向居中时的偏移量
float centerYOffset = singleCharHeight / 2 - (-mFontMetricsInt.ascent - fontHeight / 2);
//根据x、y值画出所有字符
for (int i = 0; i < mChars.length(); i++) {
canvas.drawText(mChars.substring(i, i + 1), charX, singleCharHeight * (i + 1) - centerYOffset, mPaint);
}
}

在该方法内:

  • 首先得到索引栏的高度,除以所有字符的个数,即得到单个字符的高度,便实现了将所有字符平分高度的目的;
  • 得到宽度的中间X值,目的是为了字符水平居中;
  • 由于canvasdrawText()方法中的y值为Text的baseline,所以要想实现文本的垂直方向居中,就必须计算出文本的垂直方向的中间线与所占布局中间线的偏移量;
  • 根据x、y值,以及竖直方向居中时的偏移量,我们将所有字符平均绘制在垂直方向上。

注:计算文本的垂直方向的中间线与所占布局中间线的偏移量的方法为:

首先看一下Android中的字体度量:

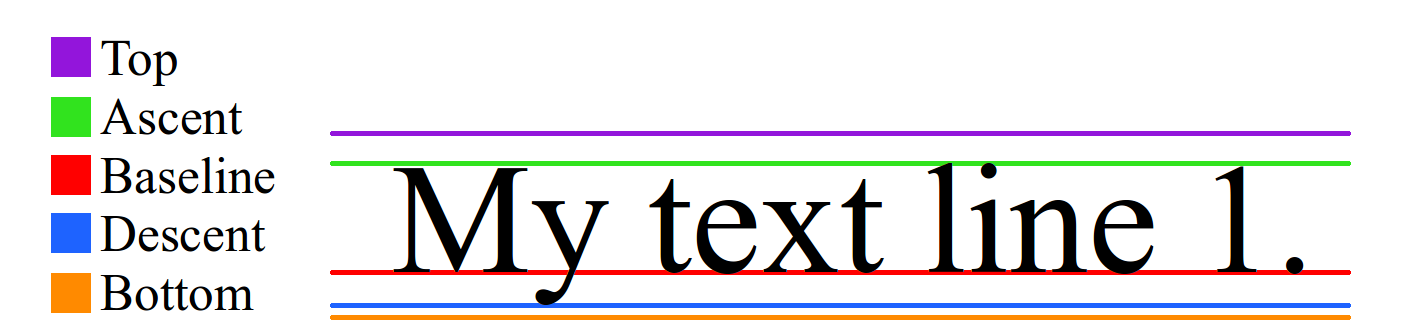
其中baseline为基线,基线以上为负值,以下为正值。即top, ascent为负值,descent, bottom为正值。

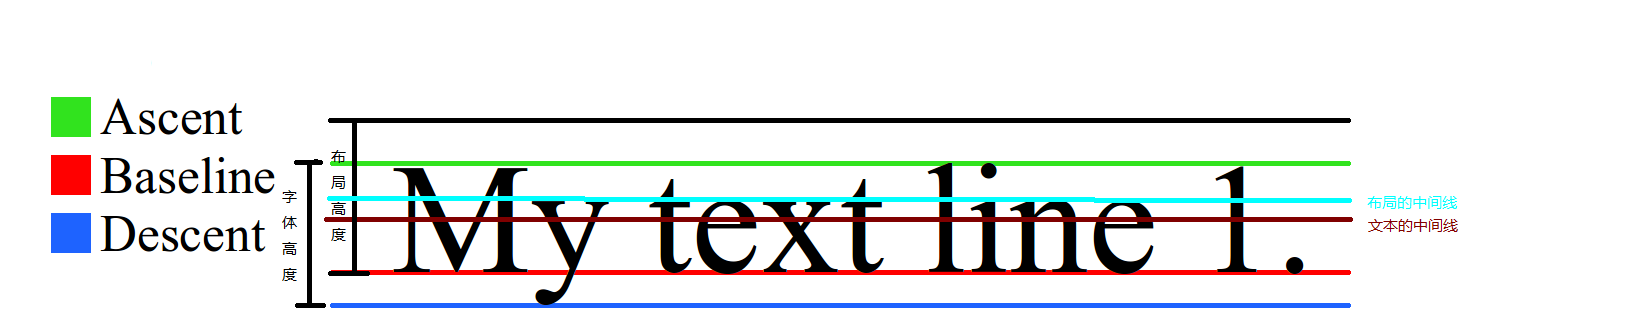
如图,若想要文本垂直居中,则需要让文本中间线与布局中间线重合即可。所以对照此图就不难计算出两个中间线的偏移量了。

添加字符索引栏CharSlideBar的点击滑动监听事件

重写onTouchEvent(MotionEvent event)方法:

1
2
3
4
5
6
7
8
9
10
11
12
13
14
15
16
17
18
19
20
21
22
23
24
25
26
27
28
29
30
31
32
33
34
35
36
37
38
@Override
public boolean onTouchEvent(MotionEvent event) {
int action = event.getAction();
switch (action) {
case MotionEvent.ACTION_DOWN: //手指按下
//设置画布颜色
mCanvasColor = mBackgroundColor;
//重新绘制
invalidate();
//显示字符指示View
if (mCharIndicateView != null) {
mCharIndicateView.setVisibility(View.VISIBLE);
}
//根据Y值得到选中的位置
selectedPositionByY(event.getY());
return true;
case MotionEvent.ACTION_MOVE: //手指滑动
//根据Y值得到选中的位置
selectedPositionByY(event.getY());
return true;
case MotionEvent.ACTION_UP: //手指抬起
//画布颜色设为透明
mCanvasColor = Color.TRANSPARENT;
//重新绘制
invalidate();
//隐藏字符指示View
if (mCharIndicateView != null) {
mCharIndicateView.setVisibility(View.GONE);
}
//复位记录上次选中位置的值
mLastSelectedPosition = -1;
return true;
}
return super.onTouchEvent(event);
}

首先根据按下与抬起的动作来设置索引栏的背景色。同时根据获取的View的Y值来计算出按下的相应字符。根据Y值得到选中的位置即相应字符的方法为:

1
2
3
4
5
6
7
8
9
10
11
12
13
14
15
16
17
18
19
20
21
22
23
24
25
26
27
28
29
30
31
/**
* 根据View的Y值得到选中的字符位置
*
* @param y
*/
private void selectedPositionByY(float y) {
//若滑动范围超出索引栏的高度范围,不再计算位置
if (y < 0 || y > getHeight()) {
return;
}
//单个字符所占的高度
float singleCharHeight = ((float) getHeight()) / mChars.length();
//计算出当前选中的位置
int position = (int) (y / singleCharHeight);
//防止重复显示
if (position != mLastSelectedPosition) {
//根据选中位置,获取相应位置的字符
String selectedChar = mChars.substring(position, position + 1);
//展示选中的字符
if (mCharIndicateView != null) {
mCharIndicateView.showSelectedChar(selectedChar);
}
//设置监听的回调方法
if (mOnSelectedListener != null) {
mOnSelectedListener.onSelected(position, selectedChar);
}
//记录下当前位置
mLastSelectedPosition = position;
}
}

随后,我们为字符索引栏设置一个监听选中事件的接口,并添加设置方法,并在上述的selectedPositionByY(float y)中实现了接口方法的回调。

1
2
3
4
5
6
7
8
9
10
11
12
13
14
15
16
17
18
19
20
21
/**
* 字符选中的监听事件
*/
public interface OnSelectedListener {
/**
* 选中的回调方法
*
* @param position 选中的位置
* @param selectedChar 选中的字符
*/
public void onSelected(int position, String selectedChar);
}
/**
* 设置监听事件
*
* @param onSelectedListener
*/
public void setOnSelectedListener(OnSelectedListener onSelectedListener) {
mOnSelectedListener = onSelectedListener;
}

这样我们就可以在相应的Activity中设置选中监听事件了。

绘制出字符指示视图CharIndicateView

自定义View属性
1
2
3
4
5
6
7
8
9
10
11
<!--字母指示视图的自定义属性-->
<declare-styleable name="CharIndicateView">
<!--字体大小-->
<attr name="indicateTextSize" format="dimension" />
<!--字体颜色-->
<attr name="indicateTextColor" format="color" />
<!--背景色-->
<attr name="indicateBackground" format="color" />
<!--背景半径-->
<attr name="indicateBackgroundRadius" format="dimension" />
</declare-styleable>
实现CharIndicateView类,继承自TextView
1
2
3
4
5
6
7
8
9
10
11
12
13
14
15
16
17
18
19
20
21
22
23
24
25
26
27
28
29
30
31
32
33
34
35
36
37
38
39
40
41
42
43
44
45
46
47
48
49
50
51
52
53
54
55
56
57
58
59
60
61
62
63
64
65
66
67
68
69
70
71
72
73
74
75
public class CharIndicateView extends TextView {
/*可自定义相关属性*/
private int mIndicateTextSize = 50; //字体大小(此处为默认值)
private int mIndicateTextColor = Color.BLACK; //字体颜色(此处为默认值)
private int mBackgroundColor = Color.GRAY; //背景色(此处为默认值)
private int mBackgroundRadius = 10; //矩形背景圆角半径(此处为默认值)
public CharIndicateView(Context context) {
this(context, null);
}
public CharIndicateView(Context context, AttributeSet attrs) {
super(context, attrs);
//初始化View相关自定义属性
initFromAttributes(context, attrs);
//初始化
init();
}
/**
* 初始化View相关自定义属性
*
* @param context
* @param attrs
*/
private void initFromAttributes(Context context, AttributeSet attrs) {
//获取相关View属性
TypedArray a = context.getTheme().obtainStyledAttributes(attrs, R.styleable.CharIndicateView, 0, 0);
try {
mIndicateTextSize = a.getDimensionPixelSize(R.styleable.CharIndicateView_indicateTextSize, mIndicateTextSize);
mIndicateTextColor = a.getColor(R.styleable.CharIndicateView_indicateTextColor, mIndicateTextColor);
mBackgroundColor = a.getColor(R.styleable.CharIndicateView_indicateBackground, mBackgroundColor);
mBackgroundRadius = a.getDimensionPixelSize(R.styleable.CharIndicateView_indicateBackgroundRadius, mBackgroundRadius);
} finally {
//回收TypedArray
a.recycle();
}
}
/**
* 初始化操作
*/
private void init() {
//设置圆角矩形背景
// float[] outerRadii = {10, 10, 10, 10, 10, 10, 10, 10};
float[] outerRadii = new float[8];
for (int i = 0; i < outerRadii.length; i++) {
outerRadii[i] = mBackgroundRadius;
}
RoundRectShape shape = new RoundRectShape(outerRadii, null, null);
ShapeDrawable shapeDrawable = new ShapeDrawable(shape);
shapeDrawable.getPaint().setColor(mBackgroundColor);
//将圆角矩形背景设置到当前View
this.setBackgroundDrawable(shapeDrawable);
//文本居中显示
this.setGravity(Gravity.CENTER);
//设置字体大小
this.setTextSize(mIndicateTextSize);
//设置字体颜色
this.setTextColor(mIndicateTextColor);
//默认不显示该布局
this.setVisibility(View.GONE);
}
/**
* 展示选中字符
*
* @param selectedChar 要显示的字符
*/
public void showSelectedChar(String selectedChar) {
this.setText(selectedChar);
}
}

字符指示布局的实现比较简单,直接继承自TextView,在初始化中设置了文本的颜色、大小、圆角矩形背景,并默认隐藏了该布局。此外,还添加了showSelectedChar(String selectedChar)方法,来显示相应的字符。

字符索引栏CharSlideBar与字符指示视图CharIndicateView建立关联

CharSlideBar我们添加如下关联方法:

1
2
3
4
5
6
7
8
/**
* 和字符指示View建立联系
*
* @param charIndicateView
*/
public void setupWithIndicateView(CharIndicateView charIndicateView) {
mCharIndicateView = charIndicateView;
}

然后在上述的selectedPositionByY(float y)中调用了CharIndicateViewshowSelectedChar(String selectedChar)方法。

到此,我们就可以实现本文开始时的效果了。

在应用中的使用方法

布局文件activity_main.xml:

1
2
3
4
5
6
7
8
9
10
11
12
13
14
15
16
17
18
19
20
21
22
23
24
25
26
27
28
29
30
31
32
33
34
35
36
37
38
39
40
41
<?xml version="1.0" encoding="utf-8"?>
<RelativeLayout xmlns:android="http://schemas.android.com/apk/res/android"
xmlns:app="http://schemas.android.com/apk/res-auto"
android:id="@+id/activity_main"
android:layout_width="match_parent"
android:layout_height="match_parent">
<!--联系人列表-->
<ListView
android:id="@+id/contact_listview"
android:layout_width="match_parent"
android:layout_height="match_parent"
android:divider="@android:color/transparent"
android:dividerHeight="0dp" />
<!--字符索引栏-->
<cn.shorr.widget.CharSlideBar
android:id="@+id/char_slider_bar"
android:layout_width="25dp"
android:layout_height="match_parent"
android:layout_alignParentRight="true"
android:layout_marginBottom="20dp"
android:paddingBottom="10dp"
android:paddingTop="10dp"
app:barBackground="#3f000000"
app:barChars="☆ABCDEFGHIJKLMNOPQRSTUVWXYZ#"
app:barTextColor="@android:color/black"
app:barTextSize="15sp" />
<!--字符指示视图-->
<cn.shorr.widget.CharIndicateView
android:id="@+id/char_indicate_view"
android:layout_width="100dp"
android:layout_height="100dp"
android:layout_centerInParent="true"
app:indicateBackground="#5f000000"
app:indicateBackgroundRadius="5dp"
app:indicateTextColor="@android:color/white"
app:indicateTextSize="20sp" />
</RelativeLayout>

Activity:MainActivity:

1
2
3
4
5
6
7
8
9
10
11
12
13
14
15
16
17
18
19
20
21
22
23
24
25
26
27
28
29
30
31
32
33
34
35
36
37
38
39
40
41
42
43
44
45
46
47
48
49
50
51
52
53
54
55
56
57
58
59
60
61
62
63
64
65
66
67
68
69
70
71
public class MainActivity extends AppCompatActivity {
private final String TAG = this.getClass().getSimpleName();
private List<ContactBean> mContactList; //联系人集合
private ListView mContactListView; //联系人列表
private CharSlideBar mCharSlideBar; //字符索引栏
private CharIndicateView mCharIndicateView; //字符指示视图
private ContactlistAdapter mContactListAdapter; //联系人列表适配器
@Override
protected void onCreate(Bundle savedInstanceState) {
super.onCreate(savedInstanceState);
setContentView(R.layout.activity_main);
//初始化变量
initVariables();
//初始化View
initView();
}
/**
* 初始化变量
*/
private void initVariables() {
ContactModel model = new ContactModel();
mContactList = model.getContactList();
mContactListAdapter = new ContactlistAdapter(this, mContactList);
}
/**
* 初始化View
*/
private void initView() {
mContactListView = (ListView) findViewById(R.id.contact_listview);
mCharSlideBar = (CharSlideBar) findViewById(R.id.char_slider_bar);
mCharIndicateView = (CharIndicateView) findViewById(R.id.char_indicate_view);
//联系人设置适配器
mContactListView.setAdapter(mContactListAdapter);
//索引栏和指示视图建立联系
mCharSlideBar.setupWithIndicateView(mCharIndicateView);
//设置选中监听事件
mCharSlideBar.setOnSelectedListener(new CharSlideBar.OnSelectedListener() {
@Override
public void onSelected(int position, String selectedChar) {
Log.e(TAG, "选中--" + selectedChar);
//根据选中的字符来定位ListView的位置
locateListViewPositionByChar(selectedChar);
}
});
}
/**
* 根据选中的字符来定位ListView的位置
*
* @param selectedChar
*/
private void locateListViewPositionByChar(String selectedChar) {
//遍历联系人列表找到对应字符的位置
for (int i = 0; i < mContactList.size(); i++) {
String nameInitial = mContactList.get(i).getNameInitial();
if (nameInitial.equals(selectedChar)) {
//定位ListView的位置
mContactListView.setSelection(i);
break;
}
}
}
}

源码及Demo

Demo源码 请点击此处下载(https://github.com/shorr/notes_demo/tree/master/CharSlideBarDemo)

0%